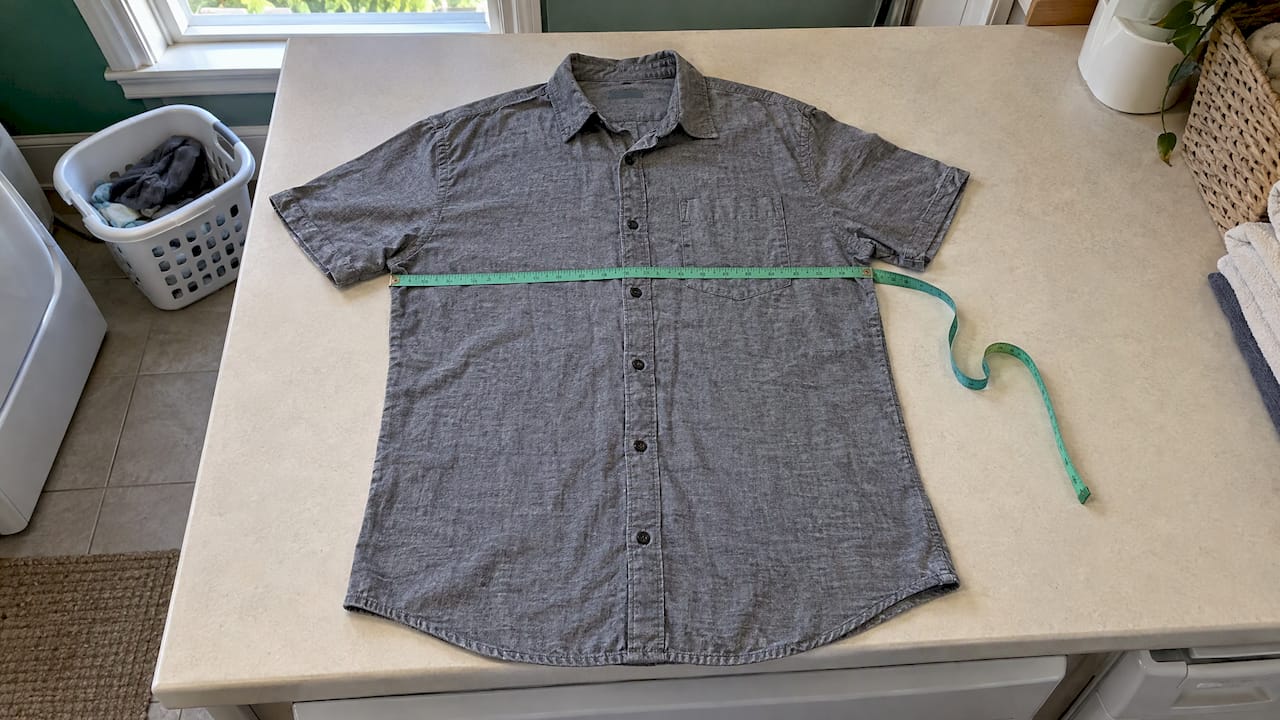
Put the measurements of the garment itself in every clothing listing: chest width, length and sleeve for tops, waist, rise, inseam and leg opening for pants. Take them with the item laid flat and relaxed, say whether each number is flat or doubled, and show the tape in a photo. A tag size alone tells a buyer very little, because brands and decades cut the same size differently. Numbers let a buyer compare your item with something already hanging in their closet, and that comparison is what turns a browser into a message, and a message into a sale.
This guide covers what to measure for each type of clothing, how to measure without errors, how to photograph the numbers and the garment, and how to write it all into a listing on Marketplace.
TL;DR
- Measure the garment, not a body: lay it flat, fasten closures, smooth it without stretching, and use a soft tape.
- Tops need chest (pit to pit), length, shoulder and sleeve. Bottoms need waist, rise, inseam and leg opening.
- State whether each width is flat or doubled, and use one unit throughout, adding metric if you like.
- Photograph the front, back, labels, flaws and at least one shot with the tape visible. Use window light, no flash.
- Write the numbers in the description as well as the photos, so buyers can search and compare.
Table of Contents
- Why measurements matter more than tag sizes
- What you need before you start
- Flat or doubled: the rule that causes most confusion
- How to measure tops, shirts and jackets
- How to measure pants, jeans and skirts
- Dresses, coats and kids' clothes
- Quick reference by garment
- Units: inches, centimeters and consistency
- How to photograph the garment
- How to write the measurements into the listing
- Common mistakes to avoid
- Buying: how to use measurements on the other side
- Where to list it
- Our view: honest numbers are the best listing strategy
- FAQ
- Sources
Why measurements matter more than tag sizes
A "Medium" from one brand can sit two inches wider than a "Medium" from another, and vintage sizing runs smaller still. Buyers know this, so many of them skip the tag and go straight to a measurement. Put This On, a menswear publication, notes that buyers use the measurements of clothes that already fit them to lower the risk of a purchase, and that listing measurements up front saves everyone an extra round of questions.
For local selling the effect is even more practical. A neighbor who messages you three times to ask about the length of a coat is a neighbor who may lose interest. A listing that answers the questions before they are asked gets fewer messages that go nowhere and more that end with an arrangement to meet.
One point to keep in mind: these numbers describe the garment, not the person. Say so plainly ("measured flat, garment only"), and a buyer will understand that the numbers are a tool for comparison rather than a promise of fit.

What you need before you start
You do not need special equipment.
- A flexible tape measure. A sewing tape or soft tailor's tape bends around curves and lies flat. A rigid metal tape fights the fabric.
- A flat, clean surface. A bed, a table or a clean floor works. A table gives you better control and is easier to photograph.
- An iron or steamer, if the item is wrinkled. Creases shorten a garment by small amounts and make the numbers unreliable.
- A pen and a note, or your phone's notes app. Write each number down as you go, with its label, so you do not have to remember which was which.
Prepare the garment first. Fasten buttons, zips and snaps, smooth it with your hand, and let the fabric rest in its natural shape. Do not pull the tape tight and do not stretch knits to reach a bigger number. If the item is stretchy, measure it relaxed, and if you want to add a stretched figure, label it as such.
Flat or doubled: the rule that causes most confusion
Most measurements are taken across the garment while it is flat, which gives you half of the full distance around. Buyers who think in body terms, like "a 40-inch chest", expect the full circumference.
There are two honest ways to handle it:
- Give the flat width and label it clearly: "Chest (pit to pit, flat): 21 in."
- Double it for a circumference and label that instead: "Chest circumference: 42 in."
Either is fine. Mixing them without a label is not. A buyer who reads "chest 21" and assumes it is the full circumference will expect a child's top. State which one you used, and use the same method on every item you list.
How to measure tops, shirts and jackets
Put This On recommends that tops and jackets include chest, shoulders, overall length and arm length, with waist and differing front and back lengths where relevant. Here is how to take each one.
Chest (pit to pit)
With the garment flat, measure straight across from the underarm seam on one side to the underarm seam on the other. Keep the tape level and do not pull. Write down the flat number. If you also give the circumference, double it.
Length
Measure from the highest point of the shoulder, next to the collar, straight down to the bottom hem. For shirts with a curved hem, measure to the longest point and say so. For jackets and coats that differ front to back, give the back length and mention the front if it is noticeably different.
Shoulder width
Measure across the back from one shoulder seam to the other, along the top of the seam line. It is the number that tells a buyer whether a blazer or jacket will fit across the back, and it is the hardest one to alter, so it matters.
Sleeve length
Start at the shoulder seam and run the tape along the sleeve to the end of the cuff. Some garments, such as raglan sleeves, have no shoulder seam to start from, so begin at the center back of the neck and state that in the listing. If you want a clear picture of where sleeve measurement points sit on different garments, this sleeve length measurement guide lays out the definitions.
Other numbers worth adding
- Waist (for fitted shirts, dresses and jackets), measured flat at the narrowest point.
- Bottom opening or hem width for sweaters, hoodies and anything with a cuffed or fitted hem.
- Armhole depth or bicep if the item is tailored.
How to measure pants, jeans and skirts
Put This On suggests pants include the actual waist, inseam and leg opening, with rise, outseam, thigh or knee added where they help. The actual waist matters because the size printed on the tag is often not what the waistband measures.
- Waist: fasten the waistband and measure straight across the top edge, flat. Double it for a circumference.
- Rise: measure from the crotch seam up to the top of the waistband. It tells the buyer whether the pants sit high or low, and it is the number that most often surprises people.
- Inseam: measure from the crotch seam down the inside of the leg to the bottom of the hem.
- Leg opening: measure straight across the bottom of one leg, flat. Double it if you want the full circumference.
- Hip or thigh: measure straight across at the widest point, flat.
- Skirts: give waist, hip if relevant, and length from the top of the waistband to the hem.
Dresses, coats and kids' clothes
Dresses combine the two sets. Give bust (pit to pit), waist, hip if the cut is fitted, and length from the highest shoulder point to the hem. If the dress has a skirt that flares, mention it. For a dress with a zipper, close it fully before measuring.
For coats, add shoulder, sleeve and back length, and mention whether the measurements are taken with the coat buttoned. Heavy outerwear is the kind of item a buyer most wants to compare against a coat of their own.
For children's clothing, measurements are even more useful than size labels, since age sizing varies widely. Give chest, length and inseam, and add the tag size as a secondary detail. Parents tend to compare with something a child already wears.
Quick reference by garment
| Garment | Must include | Worth adding |
|---|---|---|
| T-shirt or blouse | Chest (pit to pit), length, sleeve | Shoulder, hem width |
| Sweater or hoodie | Chest, length, sleeve | Shoulder, hem width |
| Jacket or coat | Chest, shoulder, length, sleeve | Waist, back vs. front length |
| Jeans or trousers | Waist, rise, inseam, leg opening | Hip, thigh, outseam |
| Skirt | Waist, length | Hip, hem sweep |
| Dress | Bust, waist, length | Hip, shoulder, sleeve |
Units: inches, centimeters and consistency
In the United States, inches are the default, and most local buyers will think in them. Use one unit for every number in a listing, and write the unit each time ("21 in"). If you want to help a buyer who thinks in metric, add centimeters in parentheses. Rounding to the nearest half inch is enough, and it keeps the listing readable. If you need to convert, a centimeters to inches converter saves doing the arithmetic by hand.
How to photograph the garment
Measurements tell a buyer the size. Photos tell them the condition, color and shape. A listing needs both, and neither replaces the other. For a local buyer scrolling through dozens of listings, a clear first photo is what makes them stop.
The shots a clothing listing needs
- Front, full view. The whole garment in frame.
- Back, full view. Buyers who see only one or two photos often assume that something is being hidden.
- Brand and size label. Readable, in focus.
- Care or fabric label. It tells the buyer the material and how to wash it.
- Details. Pockets, buttons, stitching, fabric texture, prints.
- Flaws. A close-up of every stain, snag, pill or worn spot. Showing a flaw in a photo is faster and more believable than describing it.
- One measurement photo with the tape laid on the garment.
Flat lay, hanger or worn?
Each way of showing a garment communicates something different. Flat lays show proportions, so they suit T-shirts, knitwear, pants and skirts, the items where numbers matter most. A hanger shot shows how the fabric drapes. A shot on a mannequin or a person shows the silhouette. If you can, combine a flat lay with one of the other two for jackets, dresses and anything with structure.
How to shoot a clean flat lay
- Prepare the item. Steam or iron out wrinkles, remove lint and loose threads, and fasten buttons and zips.
- Pick a plain background. A clean, matte, neutral surface that contrasts with the garment keeps attention on the item. A white sheet works for dark clothes and a gray or dark one for white clothes. Avoid beds, carpets and busy floors.
- Arrange it symmetrically. Line up the hem, sleeves and collar. A little tissue paper tucked inside can help the garment keep its natural shape, rather than looking pressed flat like a paper cut-out.
- Shoot from directly above. Hold the phone parallel to the surface so the garment is not distorted. Use a timer or prop the phone against something so it does not shake, and use the standard lens rather than the ultrawide.
- Check the edges. The whole outline of the garment should be visible, with a small margin.
Lighting without any gear
The simplest good light is a window. Put This On recommends natural, indirect light near a window, with flash, lamps and overhead lights switched off, and a bright sunbeam avoided. In practice:
- Shoot in the daytime, beside a large window, with the light falling across the garment.
- If you see hard shadows, move away from direct sun or hang a sheer curtain.
- Do not mix light sources. A ceiling light plus a window gives the item a color cast, and the color in your photo will not match what the buyer sees in person.
- Skip filters. A buyer who receives a navy sweater that looked black in your photos will tell you so.
How to photograph the measurements
A measurement photo is proof of method. It shows where you measured, so the buyer can repeat it on their own garment. Lay the tape on the garment, align it so that it starts at zero, and make sure that the beginning point, the end point and the numbers are readable. The chest or the length is usually the most useful single shot. You do not need to photograph every number; photograph the one or two that matter most and write the rest in the description.
Also keep the file size in mind. A photo that is too small looks blurry and one that is too large loads slowly. This guide to photo size for listings covers dimensions and quality. If you also sell accessories, the same logic applies to photographing jewelry for sale with a home setup.

How to write the measurements into the listing
Put the numbers in the description as well as in the photos. Text is searchable, easy to copy and easy to compare, and a buyer should not have to zoom into an image to find a length. A clear format looks like this:
Women's wool blazer, tag size M. Measured flat, garment only. Chest (pit to pit): 19.5 in Shoulder: 16 in Length: 26 in Sleeve: 24.5 in Condition: worn a handful of times, small pull on the left cuff (see photo 6).
A few habits make the listing stronger:
- Lead with the tag size, then the real numbers. The tag helps people find the item and the measurements help them decide.
- Name the method. "Pit to pit, flat" tells the buyer what to measure on their own garment.
- Mention the fabric and the stretch. A 5 percent difference means something in cotton and nothing in stretch denim.
- Be honest about flaws. The photo shows the flaw, and the description names it.
For the rest of the description, these listing description tips cover how to write a title and body that sell. If you are decluttering a whole closet, the guide to selling clothes locally walks through pricing and the handoff.
Common mistakes to avoid
- Measuring while the garment is bunched or damp. Let it lie relaxed and dry.
- Stretching knits. It inflates the numbers and leads to disappointed buyers.
- Mixing flat and doubled figures. Label each one.
- Measuring from the collar instead of the shoulder point. It changes the length by an inch or more.
- Changing the method between listings. If every item you sell uses the same points, buyers who come back can compare across your listings.
- Writing a body measurement as if it were the garment's. A chest width of 21 inches is not a 21-inch chest.
Buying: how to use measurements on the other side
If you are the buyer, the same numbers protect you. Lay a shirt or pair of pants you already like on a flat surface, measure it in the same way, and compare it with the listing. A quarter inch of difference will not matter, while two inches in the chest or an inch and a half in the inseam will. If a listing lacks a number you need, ask in the chat, because a good seller will usually measure and reply. For tips on choosing pieces that last, see how to buy secondhand clothes that last.
Where to list it
Once your numbers and photos are ready, the listing takes a few minutes. Marketplace has a dedicated Fashion category, so shoppers who are looking for clothes nearby find your listing among other clothing. Buyers and sellers can talk through direct communication and instant chat, so a buyer's question about a measurement reaches you quickly. Our platform also offers secure payments and verified seller ratings. Browse the categories, including Fashion and seven more, on Marketplace, and list your first item with the measurements ready.
Our view: honest numbers are the best listing strategy
Most clothing listings fail for a simple reason: the buyer cannot tell whether the item will fit, so they move on. A tag size is a guess, and a photo without numbers is a guess too.
We built Marketplace around local buying and selling, where a buyer can ask you a question in chat and get an answer the same day. That makes a listing with real measurements even more valuable. When the numbers are there, the conversation can move straight to the practical part: price, time and place.
Our advice to sellers is to take the five minutes. Measure flat, label the method, show the tape once, and show the flaws. It makes your listing look like it came from someone who is easy to deal with, and our verified seller ratings are where that reputation builds over time.
Marketplace
FAQ
How do I measure clothes for a listing?
Lay the garment flat, fasten the closures and smooth it without pulling. Measure chest straight across from underarm to underarm, length from the highest shoulder point to the hem, and sleeve from the shoulder seam to the cuff. For pants, take waist, rise, inseam and leg opening. Write down each number with its label and say whether it is flat or doubled.
Should I list measurements in inches or centimeters?
For a US audience, use inches, and use the same unit for every number. If you want to help a buyer who thinks in metric, add centimeters in parentheses. Choose rounding to the nearest half inch and keep it the same across your listings.
Do I double the chest measurement?
Only if you present a full circumference. The flat measurement across the garment is half of the distance around it. Either number is acceptable, as long as the listing says which one you are giving. Using the same method on every item is the simplest approach.
What is the best light for photographing clothes?
Soft, indirect daylight from a window. Turn off the flash and any lamps or overhead lights, because mixed light distorts color, and avoid a direct sunbeam, which creates hard shadows. If shadows still appear, move farther from the window or soften the light with a sheer curtain.
How many photos does a clothing listing need?
At least front, back, the brand and size label, the care label, a detail shot, a close-up of any flaw, and one photo with the tape visible. Buyers who see only one or two photos often assume something is hidden, so a fuller set builds trust and shortens the conversation.