
Start with this: take the median of three to five recent sold prices for your exact item, multiply by a condition factor (0.5 for like-new, 0.3 for good/gently used, 0.1 for worn or parts-only), then subtract your platform fee and shipping cost. That number is your listing price. List slightly above it if you have time to negotiate, or right at it if you need a fast sale.
Here's the quick math: median sold price × condition multiplier − fees = your starting price.
Before you post anything, run through this:
- Condition: Be honest, not hopeful. Buyers can tell.
- Fees and shipping: These eat 10 to 20% of your sale price before you notice.
- Speed goal: Selling this week versus this season changes where you land in the price range.
Pro Tip: Round your final number to something that looks intentional, like $45 or $120, instead of an odd figure like $43.67. Buyers trust round, confident pricing more than they trust decimals.
Key Takeaways
Pricing a used item accurately means anchoring to recent sold comps, grading condition honestly, and subtracting real costs before you ever type a number into the listing field.
| Point | Details |
|---|---|
| Anchor to sold comps | Use 3 to 5 recent sold listings, not active asking prices, to build a realistic price band. |
| Grade condition conservatively | Like-new, good, fair, and parts each shift where you land in that price band. |
| Calculate break-even first | Add fees, shipping, packaging, and a negotiation buffer before setting your floor price. |
| Match tactic to speed goal | Price near the bottom for fast sales, near the top with staged drops for patient ones. |
| List locally to protect margin | Marketplaceapp's local-first listings and fee transparency help bulky or fee-sensitive items keep more of their value. |
Table of Contents
- How to Price Used Items: Research the Market First
- Assess Condition, Completeness, and Demand
- Calculate Your Break-Even Price Before You List
- Price-Setting Tactics That Actually Work
- Where to Check Values Before You List
- Quick Category Rules for Common Item Types
- Your Pricing Checklist and Break-Even Worksheet
- List It Locally and Keep More of the Sale
- Sources
How to Price Used Items: Research the Market First
Skip the "recently sold" tab at your own risk. Active listings show what sellers hope to get. Sold listings show what buyers actually paid, and that gap can be huge, sometimes 20 to 30% on categories like electronics and furniture. Sold prices, not asking prices, are the real market anchor, and any pricing strategy that skips this step is guessing.
Here's how to build a real comp set:
- Filter for sold or completed listings on your marketplace of choice.
- Pull 3 to 5 comps that match your model, edition, color, and included accessories.
- Weight anything sold in the last 30 to 90 days more heavily than older sales.
- Toss outliers. A single sold listing at double the median usually means a rare bundle or a distracted buyer, not the real market.
Say you're selling a used stand mixer. Five sold comps in the last two months range from $85 to $140, with a median around $110. That's your band. Everything after this step is about figuring out where in that band your specific mixer belongs.
Assess Condition, Completeness, and Demand
Grade your item like a stranger would, not like someone attached to it. Four honest buckets:
- Like-new: Used a handful of times, no visible wear, original packaging intact.
- Good: Light wear consistent with normal use, fully functional, no cosmetic damage that affects use.
- Fair: Noticeable wear, scratches, or minor functional quirks, but it still works as intended.
- Parts/Not working: Broken, missing major components, sold for repair or parts value only.
Original boxes, cables, manuals, and verified serial numbers push you toward the top of your comp band. A tested, powered-on item with all its accessories can justify a price 10 to 15% above an otherwise identical untested one. Demand matters too: a "hot" category (think patio furniture in May) supports pricing near the top of the range, while a slow season nudges you toward the bottom.
Pro Tip: Test electronics on camera before listing. A 10-second video of the item powering on and working removes the single biggest objection buyers have.

Calculate Your Break-Even Price Before You List
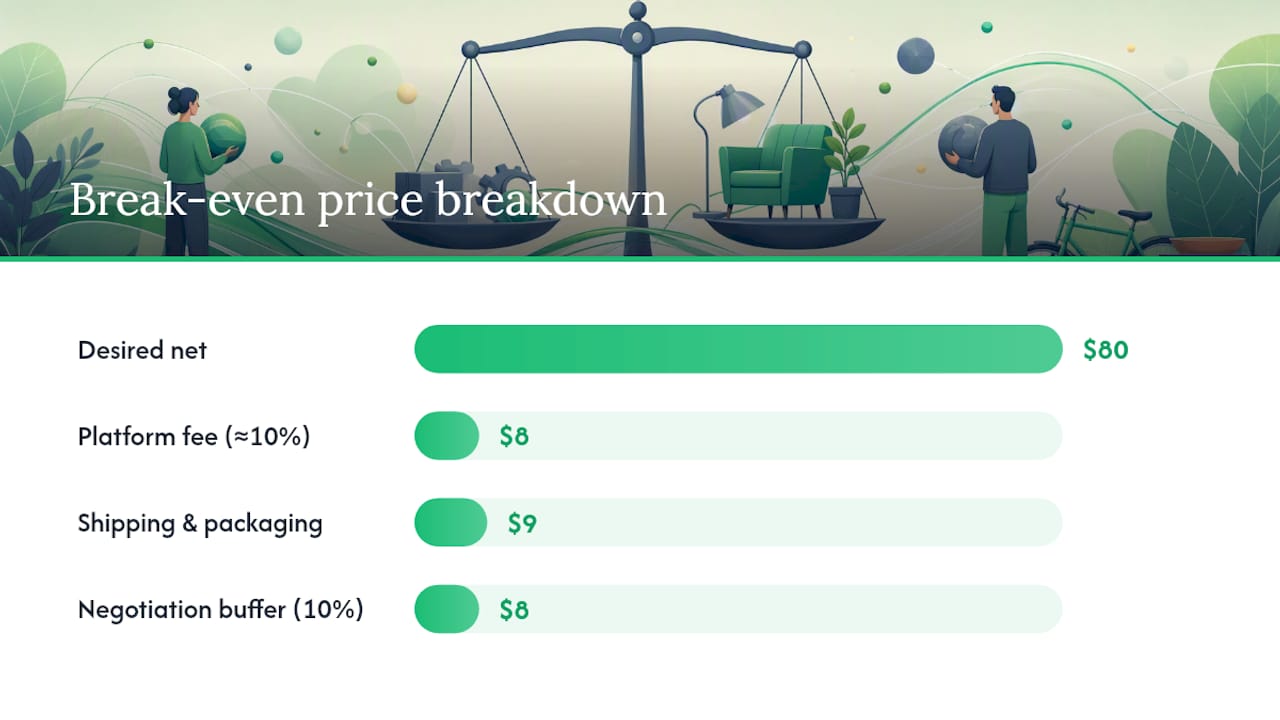
Your absolute floor price is not a guess. It's math: desired net proceeds + platform fees + payment processing + shipping + packaging + a negotiation buffer = your minimum list price. Skip this and fees quietly erase your margin without you noticing until the payout hits your account.
Here's a real example. Say your sold-comp research puts an item at $80. Run the numbers:
- Desired net: $80
- Platform fee (roughly 10%): $8
- Shipping and packaging: $9
- Negotiation buffer (10%): $8
That puts your minimum list price closer to $105, not $80, if you're shipping it. Sellers who compute this break-even upfront rarely end up selling at a loss without realizing it.
Then pick your speed tier. Fast means pricing near the bottom of your comp band and accepting a lower net for a quicker sale. Standard means pricing at the median. Patient means pricing near the top and waiting out the right buyer. Pro Tip: Factor in refurbishment or testing costs, and add a little extra buffer if the category has a high return rate, since returned items often come back with new wear.
Price-Setting Tactics That Actually Work
Once you've got your comp band and break-even floor, use a few field-tested tactics to land the right number fast.
Start with baseline percent-of-retail rules, then adjust with real comps. Curio's 50/30/10 framework is a decent starting point: like-new items around 50% of original retail, gently used around 30%, well-worn around 10%. Commonplace's research lands in a similar range, with everyday used goods typically fetching 20 to 40% of retail and like-new condition sometimes reaching 50 to 70%. Treat these as ballpark checks, not gospel. Comps always win when they disagree with a formula.
Tactically:
- List slightly above your walk-away number. A 10 to 15% negotiation buffer gives buyers room to make an offer you're happy to accept.
- Turn on "best offer" for anything with real demand. It surfaces buyers who'd otherwise scroll past a fixed price.
- Schedule price drops in advance. If it hasn't sold in 7 days, drop 10%. Still nothing after 14 days, drop another 10 to 15%.
- Choose auction versus fixed-price deliberately. Auctions work for rare or contested items with real bidding interest; fixed-price works for everything else.
A staged example: list a bike at $260 (comp median $220, plus buffer), drop to $235 after a week of no bites, then to $200 after two weeks. That's a plan, not a panic sale.
Where to Check Values Before You List
A few tools do the heavy lifting so you're not eyeballing this.
- Sold-listing filters on your chosen marketplace remain the single best free tool. Nothing beats seeing exactly what people paid.
- Valuation checkers that scan active listings give you a directional range fast, but these tools typically set their point estimate around 15% below the median ask precisely because they're built for a quick, conservative gut-check, not a final number.
- Barcode and ISBN scanners work well for books, media, and mass-produced electronics with clear model numbers.
- Local trade-in comparators give you a fast floor price, useful mainly as a "worst case, I could always take this instead" backstop.
For rare collectibles or fine jewelry, a specialist appraisal or paid guide earns its cost. For everything else: check active listings for a ballpark, confirm with sold comps, then set your price.
Quick Category Rules for Common Item Types
Pricing logic shifts by category. Here's the shorthand:
- Electronics: Depreciate fast, often 20 to 30% in the first year alone. Always verify serial numbers and IMEI, and test on camera. Original accessories included can add real value.
- Clothing: Brand and size drive price more than age. New-with-tags items can command a surprisingly high percent of retail, but wardrobes are seasonal; list winter coats in fall, not July.
- Furniture and large items: Pickup logistics shrink your buyer pool, which usually means selling locally rather than shipping preserves more of your asking price, since you skip freight costs entirely.
- Collectibles: Rarity, provenance, and verified authenticity can push prices well past any percent-of-retail formula. This is the one category where the rules of thumb genuinely don't apply.
Your Pricing Checklist and Break-Even Worksheet
Run through this before every listing:
- Pull 3 to 5 sold comps from the last 30 to 90 days.
- Grade condition honestly using the four-tier scale.
- Calculate net proceeds after fees, shipping, and packaging.
- Pick your speed tier: fast, standard, or patient.
- Set a 10 to 15% negotiation buffer above your floor.
Worksheet math: comp median ($) × condition multiplier () − fees () − shipping () = target price. For local pickup listings, skip the shipping fee entirely, and expect a friendlier price for the buyer since you're both saving on logistics.
Pro Tip: Keep a simple log of item, comp range, final sale price, and days to sell. Sellers who track this data over time get noticeably better at pricing their next ten items than their first ten.

A seller's lesson in patience
I once listed an old guitar amp at 15% above the comp median, expecting a quick sale. It sat for eleven days. Three offers came in near the bottom of my band, and I took the middle one. Lesson learned: the comp range was right, my ego about the price wasn't. Tracking that outcome made my next amp listing far more accurate.
List It Locally and Keep More of the Sale
Once you've got your target price, the fastest way to test it is to actually list the thing. This is where Marketplaceapp fits into the picture: it's built specifically for local, in-person transactions, which sidesteps two of the biggest margin killers in your break-even math, shipping cost and packaging time.
A few features worth knowing about before you post:
- Local-first listings mean no shipping fees baked into your price, which is especially useful for bulky items like furniture where logistics normally shrink your buyer pool.
- Fee transparency so you know your net proceeds before you accept an offer, not after.
- Instant chat for real-time negotiation, letting you use that 10 to 15% buffer strategically instead of guessing over email.
Once your worksheet gives you a target number, create a listing on Marketplaceapp and test that price against real local demand. If it's bulky or hard to ship, local buyers can often mean a higher net price than a nationwide shipped sale, simply because you're not splitting the value with a carrier.
Sources
A few resources worth bookmarking for your next pricing decision:
- How to Price Items for Resale: The Complete Guide
- Item Price Checker for Used Items
- How to Price Used Items to Sell: A Seller’s Guide - Commonplace
- How to Price Used Items for Maximum Profit | Curio
- How to Price Used Items for Resale — Get Rich Slowly
FAQ
What's the fastest way to price used items I need to sell this week? Skip the deep research and price at the bottom third of your comp band, using whatever 3 sold listings you can find in five minutes. Speed and price trade off directly; accept a lower number for a faster sale.
What percent of retail should I price used items at? Most everyday used goods sell for 20 to 40% of original retail, with like-new items reaching 50 to 70%. Treat these as a starting baseline, then adjust using actual sold comps for your specific item.
How do I find out what my item is actually worth? Search sold or completed listings on your marketplace of choice for 3 to 5 close matches, then take the median. Active asking prices tell you what sellers hope for, not what buyers actually paid.
When should I lower the price on a used item? If it hasn't sold within 7 to 10 days at your original price, drop it 10%. Two staged drops usually finds the real market price.
Does condition really change the price that much? Yes.