
Fix your listing fundamentals first, then spend money on promotion only for items that already show organic interest. That order matters more than the platform you're on. A boosted listing with a blurry photo and a vague title just burns cash faster than an unboosted one sits ignored.
Before you touch a "promote" button, spend 30 minutes on these:
- Swap your hero photo for one shot in natural light against a plain background.
- Check your price against three comparable active listings, not sold ones.
- Fill in every item specific field the platform offers, even the optional ones.
- Rewrite your title to lead with brand, model, or size, not adjectives like "great" or "must see."
Sellers who boost Facebook Marketplace listings after tightening these basics tend to see far better returns than those who boost first and fix later, because the extra traffic has something worth clicking on when it arrives.
Key Takeaways
Fixing listing fundamentals before spending on promotion is the single highest-leverage decision a seller can make on any marketplace.
| Point | Details |
|---|---|
| Fix before you spend | Photos, titles, and item specifics determine whether promoted traffic converts or just disappears. |
| Match the billing model to the risk | Choose pay-per-sale to cap downside risk, or CPC when you're confident in conversion. |
| Test small, scale winners | Run promotion at a conservative rate for 14 days, then scale only listings showing clear incremental lift. |
| Track the whole funnel | Watch impressions, CTR, and conversion together to know exactly which piece of a listing needs work. |
| Choose a platform built for the basics | Marketplaceapp's verified ratings, item specifics, and direct chat operationalize these tactics without extra tools. |
Table of Contents
- How Do Boosted Listings Actually Boost Listing Visibility?
- What Are the Best Platform-Specific Tactics for Visibility?
- What Listing Details Should You Fix Before You Pay to Promote?
- How Much Should You Spend Testing Paid Promotion?
- Which Metrics Actually Tell You If a Boost Is Working?
- How MarketplaceAnywhere Supports Seller Visibility
- Paid Promotion vs. Organic Optimization: Which Wins?
- Are There Legal or Policy Risks When You Boost a Listing?
- What Are the Biggest Red Flags in Paid Promotion Options?
- How Should You Split Your Budget Between Paid and Organic Work?
- Why "Fix It First" Beats Every Other Piece of Promotion Advice
- List Smarter, Not Just Louder, on Marketplaceapp
- Frequently Asked Questions
- Sources
How Do Boosted Listings Actually Boost Listing Visibility?
Paid placement doesn't create demand. It redirects existing demand toward your item faster than the algorithm would on its own. Boosted listings typically land in three spots: top-of-search slots above organic results, suggested carousels on category or home pages, and flagged positions inside "similar items" modules. Most platforms also mark promoted items with a visual cue, a small badge, a highlighted border, or a "featured" tag, so shoppers can tell it's paid placement even if they don't consciously register that.
Billing splits into two dominant models. Cost-per-click charges you every time someone taps your listing, whether or not they buy. Pay-per-sale, sometimes called cost-per-acquisition, only charges when a click converts into a completed transaction. The difference between CPC and other billing structures matters because it changes your risk profile: CPC can drain a budget on curious clickers, while pay-per-sale ties your cost directly to revenue but often carries a higher effective rate per sale.
Here's the part sellers skip past: paid visibility amplifies traffic, but conversion still depends entirely on the listing itself. Refining titles, item specifics, and price before you spend a dollar on promotion is the foundation that determines whether that extra traffic turns into cash or just inflates your view count.
Pro Tip: Check whether your platform's promoted slots show up in mobile search results, desktop results, or both. Some placements are desktop-only, which matters less than you'd think since most marketplace browsing now happens on phones.
Paid placements often add extra visual weight, like tags, photo carousels, or badges, that distinguish promoted items from everything sitting below them in organic search. That visual separation is often the entire mechanism behind why boosted items get more eyeballs. It's not magic ranking. It's a sticker that says "look here first."
What Are the Best Platform-Specific Tactics for Visibility?
Every marketplace ranks and displays listings differently, so a tactic that works on one platform can be wasted effort on another. Here's how to work each one.
Facebook Marketplace: boosting vs. posting
Boosting on Facebook Marketplace is a paid action that pushes your existing listing into more feeds and search results. Posting is just publishing the listing for free, organic discovery. They're not the same lever, and conflating them is the most common mistake new sellers make.
- Post your listing fully optimized (see the photo and title checklist below) before you consider boosting it.
- Let it sit for 48 to 72 hours to gauge organic interest, messages, saves, views.
- If it's getting some traction but stalling, boost it rather than duplicating it.
- If it's getting zero traction after three days, fix the listing first (usually the photo or price), then relist.
- Avoid relisting the same item more than once a week. Marketplace's algorithm can flag repetitive posting as spammy behavior, which hurts your seller visibility across the board.
eBay: Cassini-friendly titles plus promoted listings
eBay's search algorithm, known internally as Cassini, rewards specificity. A title like "Nike Air Max 90 Men's Size 10 White Black Running Shoes" will outperform "Cool Nike Sneakers Barely Used" every time, because item specifics and keyword-rich titles help listings surface in filtered searches that shoppers use to narrow results by size, color, and condition.
Fill out every item specific field eBay offers for your category, even the ones marked optional. Buyers filter by these fields constantly, and an empty field means your listing simply doesn't show up when someone filters by, say, "brand" or "material."
Once the organic listing is solid, eBay's Promoted Listings feature charges only when the item sells through an attributed click, a pay-per-sale model. Start with a conservative ad rate rather than accepting eBay's suggested rate, which tends to favor the platform's revenue over your margin. Test for a fixed period before adjusting.
Generic marketplaces and local apps
On local-first apps, image quality and metadata completeness matter more than clever copywriting. Most local marketplace browsing happens on a phone screen roughly six inches wide, so your first photo needs to read clearly as a thumbnail. Promoted slots on these platforms usually appear as featured rows near the top of a category page or as "sponsored" tags mixed into location-based search results.
If you sell across multiple platforms, our guide to the best reselling apps breaks down which marketplaces reward which kind of listings, useful if you're deciding where to spend your promotion budget first.
What Listing Details Should You Fix Before You Pay to Promote?
A promoted listing with weak fundamentals is money spent making a bad first impression to more people, faster. Fix these four things before you touch a boost button.
Photos. Aim for seven shots minimum: a clean hero packshot, three angle variations, one scale or reference shot (a coin, a ruler, a hand holding the item), and two close-ups of any wear, damage, or unique detail. Consistent, high-quality product photography increases click-through and reduces avoidable returns, because buyers who see exactly what they're getting are less likely to demand a refund later. You don't need professional gear. A window for natural light and a stack of books to get camera height consistent will get you 90 percent of the way there.

Title. Use the full character allowance your platform gives you, and front-load brand, model, size, and condition. Skip filler adjectives entirely, "amazing," "rare," "must see" waste characters that could hold searchable terms. Match the language buyers actually type: "iPhone 13 128GB Unlocked," not "Great Phone For Sale."
Item specifics and metadata. Every dropdown field you skip is a filter that excludes you from a shopper's search. Color, material, size, brand, condition, all of it. This is tedious. It's also close to free, and it's the single highest-leverage 10 minutes you'll spend on a listing.
Price and shipping. Competitive pricing does double duty: it drives conversion and, on several platforms, it factors into how listings rank in default search sorts. Clearly state pickup-only, local delivery, or shipping options in the first line of your description so buyers don't bounce trying to figure out logistics.
Pro Tip: Photograph every item at the same time of day near the same window. Consistent lighting across your listings makes your entire storefront look more professional at a glance, and buyers browsing a seller's other items notice that cohesion even if they can't name why.
If you're listing clothing specifically, our guide to selling clothes locally covers category-specific photo angles that matter more for apparel than electronics or furniture.
How Much Should You Spend Testing Paid Promotion?
Only promote listings with proven organic interest, meaning views, saves, or messages that show demand exists but isn't converting fast enough. Promoting dead inventory just pays to broadcast a listing nobody wanted in the first place.
- Pick your test candidate. Choose a listing that's gotten some organic engagement in its first 48 to 72 hours but hasn't sold.
- Start at the lowest reasonable rate. A conservative starting ad rate paired with a short, controlled test window keeps you from handing the platform's suggested rate your full margin before you know if promotion even works for that item.
- Run it for a fixed window, then stop and evaluate. Fourteen days is long enough to see a stable signal without bleeding budget on a hunch.
- Read incremental lift, not raw sales. Compare views and inquiries during the test window against the item's own baseline from before you promoted it, not against a different listing entirely.
- Scale winners, kill the rest. If lift is clear, increase spend gradually. If it's flat or negative after one full test window, pull the promotion and put the budget toward a different listing.
Because pay-per-sale models charge only on an attributed transaction, your downside risk is capped compared to CPC, but your effective cost per sale is usually higher. Know which model you're in before you commit a budget.
Which Metrics Actually Tell You If a Boost Is Working?
Track the funnel in order: impressions, then click-through rate, then contact or click, then conversion. A breakdown at any stage tells you exactly what to fix.
- Impressions measure reach, whether the promotion is putting your listing in front of more people at all.
- CTR measures whether your thumbnail and title are compelling enough to earn a tap.
- Contact or click-through to detail page measures interest depth.
- Conversion measures whether the full listing, once seen up close, closes the sale.
Boosted listings typically surface added performance stats like view counts, click totals, and percent increases against your unboosted baseline, which is exactly the data you need to run this diagnosis without guessing.
| Funnel stage | What a weak number usually means |
|---|---|
| Low impressions | Promotion budget too low or wrong category placement |
| High impressions, low CTR | Weak photo or title, fix these first |
| High CTR, low conversion | Price, description, or missing item specifics |
| Good conversion, still unprofitable | Ad rate too high relative to sale price |
Change one variable at a time, image, then title, then price, and give each change 7 to 14 days before judging it. Changing everything at once means you'll never know which fix actually worked.
Running Promotions Without Tripping Platform Limits
Seasonality matters more than most sellers admit: categories like patio furniture or holiday decor see visibility spikes tied to time of year, and our timing guide for local selling breaks down when demand actually peaks by category.
New seller accounts often face waiting periods before promoted listings unlock, and auto-renew settings can quietly extend a campaign you meant to stop. Check both before you launch anything.
- Batch-test similar items together so you can compare results across a consistent category.
- Audit your active catalog monthly to catch stale listings still burning ad spend.
- Turn off auto-renew by default, then opt back in only for confirmed winners.
Pro Tip: Set a calendar reminder for the exact day your test window ends. It's easy to let a promotion run three extra days "just to see," and those extra days rarely change the verdict.
How MarketplaceAnywhere Supports Seller Visibility
MarketplaceAnywhere builds several of the fundamentals this guide covers directly into the platform instead of leaving them to chance. Verified seller ratings give buyers a trust signal before they even open your listing, which tends to lift click-through on categories where buyers are naturally cautious, electronics and vehicles especially. Direct buyer-seller chat and push notifications mean inquiries get answered fast, and speed to response is one of the biggest hidden factors in whether a "contact" turns into a completed sale.
Categorized listings with detailed item specifics fields let you apply the metadata completeness rule covered earlier without hunting for workarounds. The article library, covering decluttering, pricing, and safe transactions, gives sellers a place to keep sharpening the fundamentals between listings.
| What it solves | Feature |
|---|---|
| Buyer trust before contact | Verified seller ratings |
| Slow response killing conversions | Instant chat, push notifications |
| Filtered search visibility | Categorized listings, item specifics |
Paid Promotion vs. Organic Optimization: Which Wins?
Organic optimization wins on cost and durability. It's free, it compounds across every listing you post, and a well-written title keeps working long after you've forgotten you wrote it. Paid promotion wins on speed. It can put a listing in front of buyers within hours instead of waiting days for organic algorithm traction to build.
The honest comparison isn't which one is better. It's which job each one is suited for. Organic work fixes a listing's ceiling, how well it can perform at its absolute best. Paid promotion raises the floor temporarily, getting more people to see that ceiling sooner. Spend money on promotion for a listing with a low floor and a high ceiling, meaning strong photos and title but slow initial traction. Spend zero dollars promoting a listing with a low ceiling, meaning weak fundamentals, because no amount of visibility fixes a bad photo.
A useful gut check: if you'd be embarrassed to have 10 times more people see this listing right now, don't boost it yet. Fix it, then boost it. That single rule prevents most of the wasted ad spend sellers rack up chasing visibility instead of conversion.
Are There Legal or Policy Risks When You Boost a Listing?
Every major marketplace has policy language covering promoted content, and violating it can get your promotion pulled or your account restricted, not just your ad dollars wasted. The most common violation is misleading category placement, listing an item in a category designed to catch more browsing traffic even though it doesn't belong there.
Duplicate listing spam is another frequent flag. Reposting the identical item repeatedly to farm fresh visibility, rather than waiting out a natural relisting cadence, tends to trigger automated spam detection on most platforms. Price manipulation, listing an inflated "original price" next to a fake discount, violates advertising standards on platforms that operate in jurisdictions with truth-in-advertising rules, and enforcement varies by region.
Item eligibility matters too. Not everything that's legal to sell is eligible for paid promotion; restricted categories like supplements, weapons accessories, or certain electronics often can't be boosted even when they can be listed. Check your platform's specific promoted-content policy before setting up a campaign, since the rules differ enough between marketplaces that assuming one platform's policy applies to another is a common, avoidable mistake.
What Are the Biggest Red Flags in Paid Promotion Options?
The clearest red flag is a promotion tool that won't show you performance data mid-campaign. If you can't see impressions or clicks while a boost is running, you have no way to catch a bad spend before it's over.
Watch for these warning signs before committing budget:
- No test window option, forcing you into a long minimum commitment before you've seen any data.
- Suggested rates with no visible calculation, where the platform recommends a rate but won't show what it's based on.
- Auto-renew defaulted on with a buried opt-out, a common way campaigns quietly outlast their usefulness.
- No incremental comparison, meaning you can't see performance against your own listing's baseline, only raw totals that tell you little.
- Category placement you didn't choose, where a promotion tool pushes your item into a broader, less relevant audience to inflate impression counts without improving actual buyer fit.
None of these make a promotion tool useless, but any one of them should slow you down and make you test smaller before committing real budget.
How Should You Split Your Budget Between Paid and Organic Work?
Spend time before you spend money. Organic fixes, better photos, a rewritten title, complete item specifics, cost nothing but attention, and they raise the ceiling on every dollar you eventually put into promotion. A reasonable split for most casual and small-merchant sellers is to treat organic optimization as mandatory groundwork and cap paid promotion at a small, defined test budget per listing until you've proven lift.
Once you've identified winners through the test-and-scale framework covered earlier, shift more of your promotion budget toward those specific listings rather than spreading it evenly across your whole catalog. Even spending flatters your worst listings and starves your best ones of the extra push that would actually move them.
A practical rule: for every dollar you plan to spend on boosting, spend the equivalent time (not money) auditing that listing's photos and title first. Sellers who skip that step consistently report weaker returns on paid promotion, because they're accelerating a listing that was never going to convert well regardless of how many eyes saw it.
Why "Fix It First" Beats Every Other Piece of Promotion Advice
The advice sellers get most often is tactical: boost at this time of day, use this ad rate, run it for this many days. That's all useful, but it skips the actual bottleneck. Most underperforming listings aren't underexposed. They're unconvincing. A promoted listing with a dim, cluttered photo just shows that same dim, cluttered photo to more people faster.
What's overrated in most promotion advice is the idea that paid visibility is a growth lever you can pull independently of listing quality. It isn't. It's a magnifier. Point it at something strong and it accelerates a sale you were already going to make eventually. Point it at something weak and it accelerates the number of people who scroll past without a second glance.
What the reader should prioritize first isn't a promotion budget. It's an honest audit of their own current listings, photos, titles, item specifics, against the checklist in this guide. Platforms like MarketplaceAnywhere make that audit easier by exposing seller ratings and detailed categorization fields directly in the listing flow, so the fix and the sale happen in the same place instead of across five disconnected tools.
List Smarter, Not Just Louder, on Marketplaceapp
Most sellers treat visibility as something you buy. On Marketplaceapp, it's something you build into the listing itself, then amplify only when it's earned. The platform's verified seller ratings and detailed item specifics fields mean your fundamentals, the photos, the title, the metadata, are working for you the moment you hit publish, not after you've spent money finding out they weren't good enough.
Because Marketplaceapp focuses on local transactions, your listing reaches buyers close enough to complete a deal fast, without the shipping friction that slows down conversion on nationwide platforms. Direct chat and push notifications mean a serious inquiry gets a response in minutes, not the next day, which is often the real difference between a sale and a stale listing.
If you've just run through the photo and title checklist above, the next move is simple: list your item on Marketplaceapp and see how a completed, well-photographed listing performs locally before you spend a dollar on promotion.
Frequently Asked Questions
What's the fastest way to boost listing visibility without spending money? Rewrite your title to lead with brand, model, and size, fill every item specific field, and replace your hero photo with one shot in natural light. These three changes cost nothing and often move a listing from ignored to active within a day or two.
How much should I spend on my first promoted listing test? Start at the lowest rate your platform allows and run it for a fixed 14-day window. That's long enough to see a stable signal without committing a large budget on a hunch, and it matches the conservative testing approach experienced eBay sellers use to avoid platform-suggested rates that favor the marketplace's margin over yours.
Should I promote every listing or just some? Promote only listings that already show organic interest, meaning views, saves, or messages, but haven't converted yet. Promoting a listing with zero organic traction usually means the listing itself needs fixing, not more visibility.
How long should I run a boost before deciding if it worked? Give any single change, whether it's a boost, a new photo, or a price adjustment, 7 to 14 days before judging results. Shorter windows tend to show noise rather than a real trend.
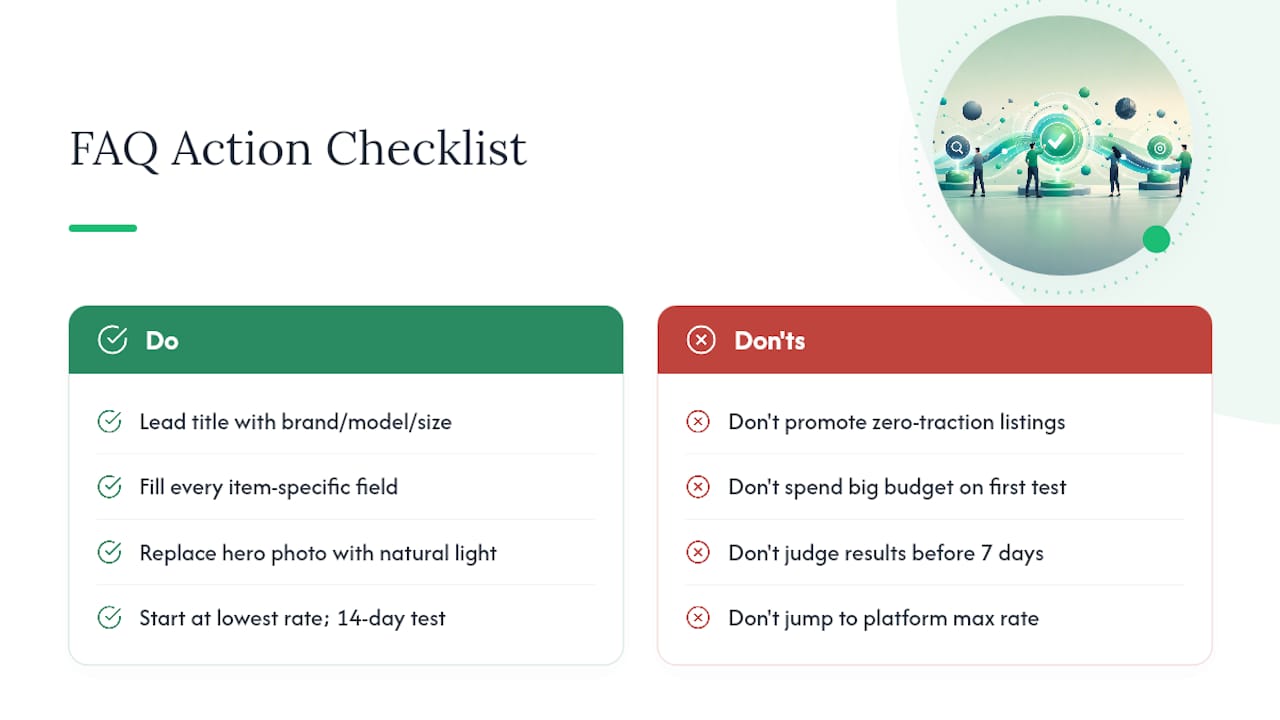
Does a higher-priced boost or ad rate always mean more visibility? Not necessarily. A higher rate can win more auction-based placements on some platforms, but it also erodes your margin faster. Test incrementally, in small percentage-point increases, rather than jumping straight to a platform's suggested maximum rate.
Sources
- What’s the difference: CPC vs CPM? | Criteo
- How to boost Facebook Marketplace ads and listings (2026 edition) | LeadsBridge
- How to Promote an eBay Listing (2026) | Ecomli
- Boosted Listings – Depop Help Centre
- Product photos that sell: marketplace image rules decoded · Robnu